|
Opening Up the Fretboard
by Dan Miller
In this lesson we are going to look at some methods that can help open up the fretboard by using what many refer to as “box patterns.” However, before we look at the patterns I recommend that any student of the guitar memorize two things. First, I will encourage you to memorize the names of the notes on every fret of the low E string and the A string. Secondly, I recommend that you memorize three simple one-note fretboard patterns (which I will outline below). The one-note patterns will help you easily find the location of any single note on the entire fingerboard. In other words, if I asked you to quickly find every G note that is located on the entire fingerboard could you do it? If not, the one-note patterns will help you.
Armed with all the note names on the low E and A strings and the one-note patterns, and a knowledge of the five major scale patterns that are presented later in this lesson, you will be able to play all of the major scales at any location on the fingerboard. After all of these patterns are laid out for you, I will then show you how you might work with them, in a practical manner, to advance your comfort level and ease of use when playing any song anywhere on the fingerboard.
Here are the four steps that will be outlined in this lesson:
Step One: Memorize the Notes on the Low E and A Strings.
Step Two: Memorize Three Main One-Note Pattern Relationships.
Step Three: Memorize the Five Major Scale Patterns.
Step Four: Put it all to Good Use By Working With a Tune.
Step One: Memorize the Notes on the Low E and A Strings
This step is fairly simple. Look at the diagram below and simply memorize the note names at each fret on these two strings (low E and A). If this seems like too large of a task, then just focus on learning the low E string first, that is the most important one to learn. One way to do this is to get out your guitar, play each note all the way up the string, and name each note as you play it. In order to become familiar with the enharmonic notes (F# is enharmonic with Gb, etc.) without it being too cumbersome when you are naming the notes as you play them chromatically, simply name the sharps as you are moving up in pitch (from the nut towards the saddle) and then as you move back down in pitch (back down towards the nut), name the flats. For example, as you play the notes moving from lower to higher pitch on the low E string you would say, “E, F, F#, G, G#, A, A#”, etc. Then as you move back down you will say, “E, Eb, D, Db, C, B, Bb”, etc. Memorize these note locations to the point to where someone could say to you, “Eighth fret, A string” and you would immediately be able to respond, “F” without hesitation.

Step Two: Memorize Three Main Note Pattern Relationships
G Note Patterns:
Below are a few of the patterns that you can use in order to find various notes on the fingerboard. Here we are just looking at the G note, as an example, but the same patterns apply to all notes.
Pattern I: Diagram I
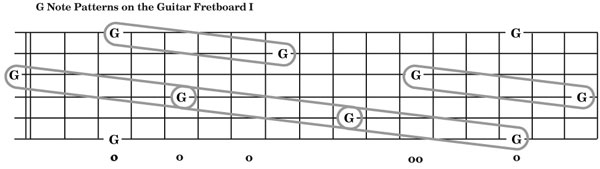
The first set of patterns are shown in diagram I. Do you tune your guitar by fretting the 5th fret on the low E string (A note) and matching it with the open A note and then fretting the 5th fret of the A string (D note), etc? If so, you know that this works on every pair of strings except the G to B strings where you have to offset one fret to get the match. If you know this tuning method, then the patterns shown in diagram I are familiar to you. Take a look at the diagram for a moment. You will notice that with the exception of the G to B string, everywhere on the fretboard you find a G note, you will find that same note on the next lower-pitch string five frets up. This is a very useful pattern to know when you are moving from one area of the fretboard to another, i.e., moving from a down-the-neck position to an up-the-neck position or vice-versa. Knowing exactly where all your root notes are, and being able to find them quickly, makes it easier to move around the fingerboard in an efficient manner when improvising. When learning any of these patterns, do not simply memorize the locations intellectually. Play these patterns and gain a good kenetic feel for their spacing and distance.
Pattern II: Diagram II
The second pattern will be familiar to you if you have ever played the bass guitar. Many bass guitar lines work around this particular pattern. Take a look at the pattern. You will notice that from the low E and A strings you can find another G note on the fingerboard by moving two strings higher in pitch and two frets down the fingerboard. The same is true at the 10th fret of the A string moving to the 12th fret of the G string.
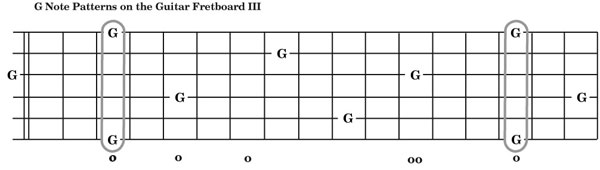
Pattern III: Diagram III
The third pattern is simple and pretty obvious. Since the low E and high E strings are both E notes, then it stands to reason that at every fret going down the fingerboard on those two strings the notes will be the same. This is a good thing to remember.
How can using these patterns help me?
Do you realize that if you know these three patterns and then memorize where the G notes on the low E string of the guitar are located (third and fifteenth frets), that you can easily find all of the other G notes on the fingerboard in seconds! From one of the two G notes on the low E string, any other G note is only one or two steps away using a combination of one or two of these patterns. Test yourself and see how fast you can get from one G note, to the next, to the next, to the next. See if you can identify any new patterns, or note maps, that work for you. Finding useful ways of visualizing the fingerboard will give you a good mental picture of how all the notes are laid out. This can be very useful because if you are improvising in the key of G and you have a good mental picture and intuitive sense of where all the G notes are located you will always be able to find your way back to the root should you get lost. Finding the root will help you reorient yourself and you will be able to continue with your solo instead of having to “crash and burn.” Familiarization with the G note patterns is just the beginning step in your fingerboard familiarization training, but it is an important one. Think about it — if you can find all the G notes quickly, using these patterns, then you can apply these same patterns to the other notes as well. Since you’ve memorized all of the notes on the low E and A strings, once you’ve memorized these patterns, you will be able to easily find any note on the fingerboard.
Getting a Feel for the one-note patterns
Anytime you learn a new pattern, lick, or phrase it is desirable to work to get it out of your head and under your fingers in such a way that it becomes second nature. It transforms from an intellectual idea to an intuitive feeling. This requires getting the knowledge out of your head and into your hands. In order to do this, you need to gain a muscle memory of these patterns. Here are a couple of excercises you can practice to begin to build muscle memory of these patterns and positions. These are just two examples. After working with these see if you can come up with a few more of your own. '
Step Three: Memorize the Five Major Scale Patterns
Now that you know how to easily find any single note on the fingerboard, I am now going to show you how to be able to easily play any major scale at any location on the fingerboard. However, it requires a little bit of work because you need to memorize the five “box patterns” that are show on the next page.
Pattern 1 is built from a tonic, or root, note (I) that is positioned on the low E or high E strings.
Pattern 2 is built from a root note that is on the A string.
Pattern 3 is built from a root note that is on the D string
Pattern 4 is built from a root note that is located on the G string.
Pattern 5 is built from a root note that is located on the B string.
Now that you know the location of every note on the fingerboard from your study of steps one and two of this lesson, you should be able to look at these patterns and play a major scale from any note on the fingerboard. If you take the time to memorize and familiarize yourself with these patterns, finding the major scales will become second nature. After you have memorized these box patterns, the next step in fretboard familiarization would be to learn how to connect them, for instance you could play one octave of a scale starting with Pattern 1 and then when you get to the root note on the D string, shift to Pattern 3 to play the next octave. There are many various ways to combine these patterns. The more you work with these patterns, by themselves or in combination, the better informed your ear and fingers will become.
The chart at the bottom right corner of the next page shows you the positions of various major scales. On this chart the scale pattern numbers are along the top and the scale name is along the side. If you wanted to use Pattern 1 to play a C scale, you’d simply look under the Pattern 1 column and follow it down to the “C” row and find that the root now is at the 8th fret. Of course, if you memorized your note map (steps one and two), you’d already know that! But this chart will help you in a pinch.
Segovia Scales
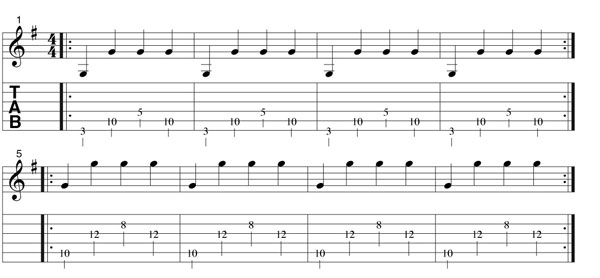
One way to practice connecting these box patterns in a more vertical fashion (moving up and down the neck) is by practicing “Segovia Scales.” They are called “Segovia Scales” because they are based on fingering patterns that were devised by the great classical guitar player Andres Segovia. I’ve provided the Segovia G major scale exericse here. If you would like to find Segovia Scales for other major, and minor, scales, they can be found at numerous web locations through an on-line search.
An examination of the Segovia Scale for G major reveals a movement from Pattern 1, to Pattern 3, to Pattern 2, to Pattern 4 while acsending. Then he moves from Pattern 4, to Pattern 5, to Pattern 1 on the decsending run.
Step Four: Put it all to Good Use By Working With a Tune
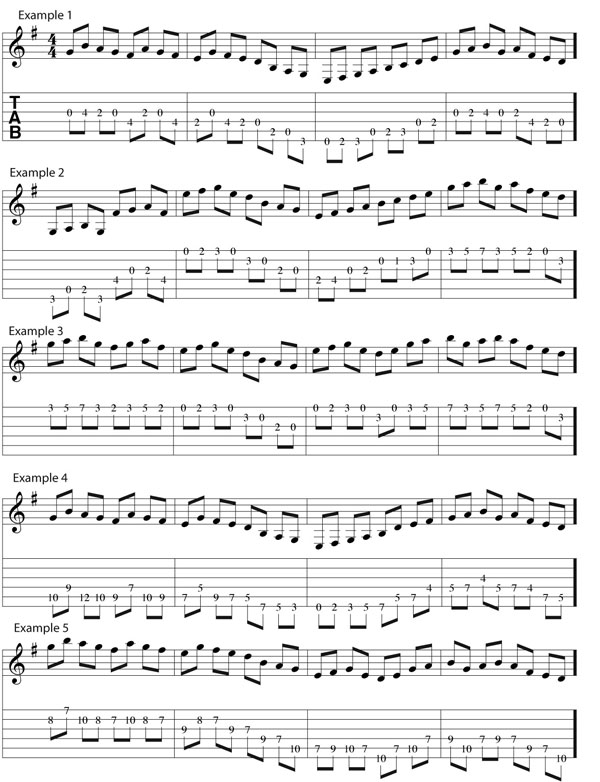
The way I recommend you gain practical knowledge of these patterns is to pick your favorite song and then learn to play it at every position on the fingerboard. The method would be to take the root note of the song and then learn how to play it at each different root note position on the neck. As an example, I’ve done this with the first 4 bars of the tune “Blackberry Blossom” as shown on the next page.
In Example 1, I start the G note on the open G string. In Example 2, I start the same melody on the G note at the third fret of the low E string. In Example 3, I start the melody on the G note at the third fret of the high E string. In Example 4, I start the melody at the G note at the tenth fret of the A string, and in Example 5 I start at the G note located at the 8th fret of the B string.
Once you are familiar with scale patterns, taking any tune and playing at various locations on the neck is a fun way to continue to explore the fretboard and familiarize yourself with the patterns. Good Luck!
|